Important note:
Downlinks should only be used to a limited extent depending on the infrastructure. In the free version of TTN, the Fair use policy says, that no more than 10 downlinks should be made. You also have to observe the regulations within the Limit of the duty cycle limitation. That is why Downlinks are only to be carried out with caution and when absolutely necessary. The number of possible characters that can be sent is limited by the respective spreading factor (With a SF of 12 only 51 characters).
The applicable and possible downlinks depend on the device and the firmware version.
The described examples do not claim to be complete and are used at your own risk.
Remote Configuration
IoT devices are often installed at places that are difficult to reach. If you need to change the settings of such a device it is often not easily possible to get physical access to attach a config adapter.
Many of our devices support Remote Configuration that allows you to change the configuration of the device by sending Downlink messages via LoRaWAN.
The Remote Configuration must be enabled in the device by setting the parameter RemoteConf to true. If this is set to false, none of the remote commands described here will work, and you can only activate it with physical access to the device. This is meant as a security feature if you want to make sure that your device will not be controlled over the network.
If you are using Remote Configuration, please be aware that LoRaWAN devices can only be reached by the network under certain conditions. See Uplinks and Downlinks.
Lobaro LoRaWAN devices receive remote configuration commands as Downlinks on port 128. Responses to those commands will be sent as Uplinks on port 128 (and 129-131 for long responses). The remote commands and their responses are all encoded in ASCII, to make it easier for humans to use them.
The first byte of a Downlink message on port 128 contains a single character that identifies the command you want to send. Some commands take a parameter following the command char.
The responses to a command start with the same character as the command followed by an optional parameter. If a command is unknown or it fails for some reason, an error response is sent via Uplink that contains with a ! followed by a readable error message.
Changing configuration does nothing until you save the changes and reboot the device. The device has a safety feature that prevents configurations that make the device unusable. A new configuration is tested in the first run after rebooting. Only after the device reaches a stable state will the configuration be adopted and used permanently. If a problem occurs the device will restore its last stable connection and reboot. If the device uses OTAA (which we recommend) the device will only adopt the new configuration only after a join request is accepted, to make sure the LoRaWAN parameters are correct. After a few failed attempts it will restore the previous configuration. This can take up to about 10 minutes.
Downlink Messages (Port 128)
Responses are sent as uplinks on port 128 and 129-131 for long responses.
For long reponses the first part is sent on Port 129, the middle parts (if exist) on Port 130 and the last part on Port 131. A stateful parser can concatinate long responses based on Port and FCnt.
Depending on the firmware version not all commands might be supported on all devices.
Please reffer to the manual of your product for more details.
| Char | Command | Parameter | Hex | Comment |
|---|---|---|---|---|
? | Request firmware and version | None | 3F | |
g | Get config parameter value | Name of parameter | 67 | |
r | Reset config parameter value | Name of parameter | 72 | |
s | Set config parameter value | <name>=<value> | 73 | |
| S | Set config parameter value + Save and reboot | <name>=<value> | 53 | Not supported on all devices |
a | Append to config parameter value | <name>=<value> | 61 | |
b | Reboot device without saving | None | 62 | |
w | Save config and reboot device | None | 77 |
?
Request firmware and version. This command triggers the device to send what firmware it is running and in which version. This can be used to test if the remote configuration is working.
g<name>
Get the value of the config parameter <name>. This command makes the device sent a response containing <name>=<value> as parameter giving you the current value of a configuration parameter.
r<name> / r*
Reset config parameter <name> to its default value. As a confirmation the device sends a response containing <name>=<value>, reporting the new value of the parameter.Sending the special value * will reset all config parameters.
s<name>=<value>
Set config parameter <name> to <value>. Sets the parameter to the value given in the parameter. As a confirmation it sends a response containing <name>=<value>, reporting the new value of the parameter.
a<name>=<value>
Append <value> to the config parameter <name>. This command appends the value given to the current value of the parameter. This is intended to allow setting values that are too long for a single Downlink message. As a confirmation it sends the length of the config parameter's value after the appending. Append works for config parameters of type string.
b
Reboot device without saving. This command restarts the device. Any changes too the config that have been committed before will be lost! This command does not send a Response.
w / wFORCE
Save config and reboot device. This command saves all configuration changes to a temporarily configuration and restarts the device. Only if the device boots successfully and reaches normal operation mode is the new configuration made permanent. If any fatal configuration error occurs or if the LoRaWAN OTAA Join does not succeed, the previous configuration will be restored and the device restarted again. This command does not send a Response.If you add the special argument FORCE to the command, the configuration will be made permanent without testing the configuration.
Using wFORCE can leave your device useless and unreachable!
Do not use wFORCE unless you have a very good reason. If the device is set to an invalid configuration it will no longer be reachable by the Network Server. From such a state it can only be recovered with physical access and a config adapter. It will also most likely drain the battery quickly.
Example: changing configuration
The following is a short example of how you can update two configuration values remotely (that includes rebooting the device).
Most LoRaWAN devices (all that are running in Class A, which are by fast the most) can only be reached when they contact the network. Network Servers (like The Things Network) provide a mechanism to enqueue messages for a specific device. The messages will be sent as downlink the next time that device contacts the network. Normally, multiple messages can be enqueued and will all be transmitted as soon as possible. Please be advised that the gateways communicating with your device must respect their duty cycle, so there is a very limited amount of downlinks that can be sent for a given time (downlinks are expensive).
For this example we want to set Time Synchronization to sync the internal clock every 10 days, and we want to deactivate Adaptive Date Rate (ADR). These are both LoRaWAN configuration parameters that are present on most devices (find details under LoRaWAN Configuration), but you can of course also change parameters specific to your device, e.g. Modbus configuration or wMBus configuration, with this feature.
We will need to send three commands:
sTimeSync=10– set time synchronization to 10 day intervalsADR=false– disable adaptive data ratew– write changes to device configuration and reboot
The s-commands will of course differ for your case, but the w command at the end will be the same.
After sending the final command, the device will reboot and try the new configuration. If the boot process and the connection to the network are successful, the device will make the changes permanent. If there is a problem (if you accidentally set an invalid value, e.g. sADR=flase or if you changed your AppKey to wrong value and your OTAA fails), the device will revert to the previous configuration.
Downlinks on TTN
How you sent your downlinks depends on the LoRaWAN Network Server you use to connect your devices. You will most likely need to convert the commands (that are all ASCII) to some different representation, e.g. Hex or Base64.
In The Things Network you find the downlink panel on the "Device Overview" page for each device, directly below the panel that shows you OTAA/ABP information (DevEUI, AppKey, ...). It is shown in the following screenshot:
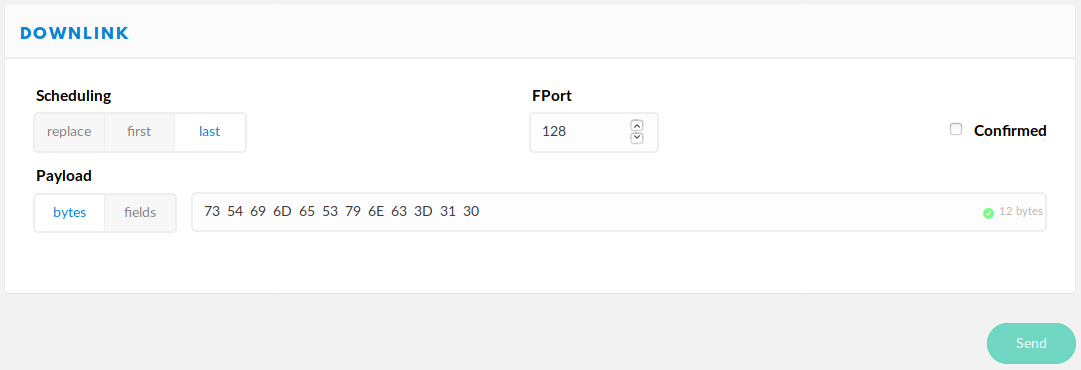
You will have to encode the commands in hex. In the screenshot you see 73 54 69 6d 65 53 79 6e 63 3d 31 30 as the message to send; that is the hex representation of sTimeSync=10. The Port used for remote configuration for our devices is 128. When you enter multiple messages to send, be sure to set the correct scheduling (last). The preselected replace will overwrite your previously enqueued messages.
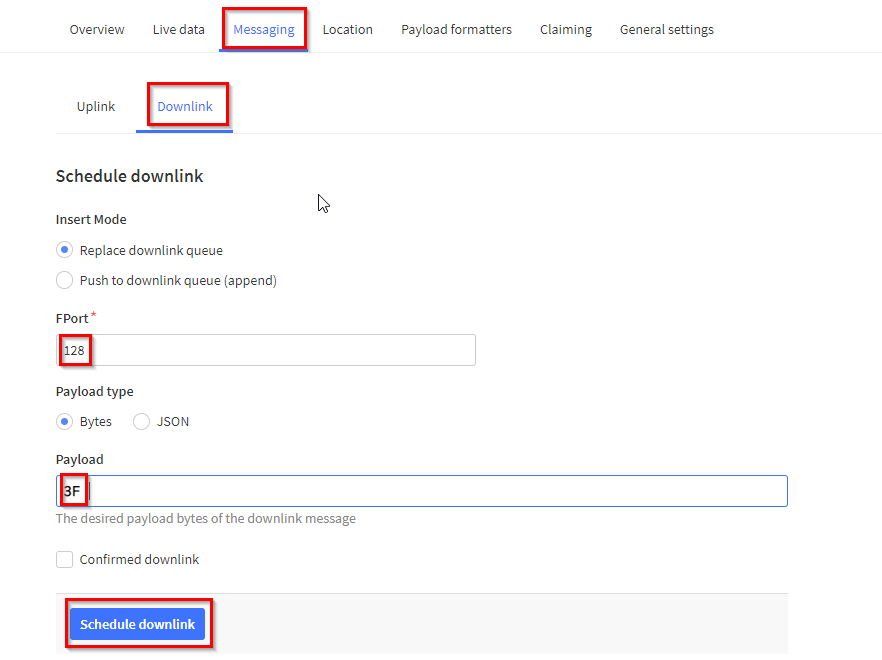
Example 1: Getting the firmware version:

Example to do this over TTN Console:
On your TTN Console choose your Application and your Device, Messaging:
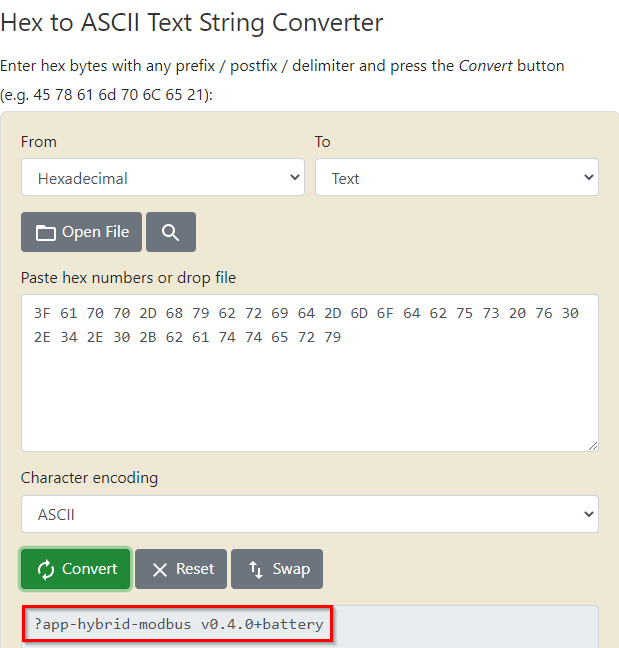
The downlink and response can be viewed in "live data":
![]()
![]()
The result of the converted HEX to ASCII is:
Example 2: Change Configuration Pressure and Temperature Sensor via Script:
Transform:
SMbCmd=0 0/10 * * * *:R,9600,8N1:010300160002,010300260002,fa0400050001
to base64:
U01iQ21kPTAgMC8xMCAqICogKiAqOlIsOTYwMCw4TjE6MDEwMzAwMTYwMDAyLDAxMDMwMDI2MDAwMixmYTA0MDAwNTAwMDE=
Example for TTN:
The downlink via a script via TTN would then look like this:
 curl --location \ --header 'Authorization: Bearer NNSXS.XJAZK3VF3YBMXX_API_KEY_KR2HFG6ABXXXXXX.CP4WZUOXXXXXXXB5WW4UUSMNXRLUJ7LVO2U' \
--header 'Content-Type: application/json' \
--header 'User-Agent: my-integration/my-integration-version' \
--request POST \ --data '{"downlinks":[{ "frm_payload":
"U01iQ21kPTAgMC8xMCAqICogKiAqOlIsOTYwMCw4TjE6MDEwMzAwMTYwMDAyLDAxMDMwMDI2MDAwMixmYTA0MDAwNTAwMDE=",
"f_port":128 }] }' \
'https://eu1.cloud.thethings.network/api/v3/as/applications/your-ttn-applicationID/devices/eui-your_TTN_end_deviceID/down/push'
(You should use your own data for the API KEY, your-ttn-applicationID and your your_TTN_end_deviceID)
See detail TTN Documentation:
TTN Documentation scheduling-downlinks
Example for Chirpstack:
The downlink via a script via Chirpstack would then look like this:
curl -X POST --header 'Content-Type: application/json'
--header 'Accept: application/json'
--header 'Grpc-Metadata-Authorization:
Bearer xxxxxxxxx_API_KEY_xxxxxxx' -d
'{ "deviceQueueItem": { "confirmed": false, "data":
"U01iQ21kPTAgMC8xMCAqICogKiAqOlIsOTYwMCw4TjE6MDEwMzAwMTYwMDAyLDAxMDMwMDI2MDAwMixmYTA0MDAwNTAwMDE=",
"fPort": 128
 } }'
'http://192.198.0.101:8080/api/devices/ChirpStack_DevEUI/queue'
(You should use your own data for the API KEY, your Chirpstack_IP_Adress and your your_ChirpStack_DevEUI)
See detail Chirpstack Documentation:
Now that version 4 of Chirpstack has switched to stable mode, there are a few differences compared to version 3:
The actual API has now switched from the Swagger API with UI to gRPC integration, but for compatibility and transition reasons the chirpstack-rest-api can be installed as an additional component. However, experience has shown that there are changes that need to be considered. "deviceQueueItem" became ""queueItem" and by default the API can now be reached on port 8090 and no longer 8080. Here is the above example of how the call should look like with Chirpstack v4:
curl -X POST --header 'Content-Type: application/json'
--header 'Accept: application/json'
--header 'Grpc-Metadata-Authorization:
Bearer xxxxxxxxx_API_KEY_xxxxxxx' -d
'{ "queueItem": { "confirmed": false, "data":
"U01iQ21kPTAgMC8xMCAqICogKiAqOlIsOTYwMCw4TjE6MDEwMzAwMTYwMDAyLDAxMDMwMDI2MDAwMixmYTA0MDAwNTAwMDE=",
"fPort": 128
 } }'
'http://192.198.0.101:8090/api/devices/ChirpStack_DevEUI/queue'
Be sure your number of characters matches with the possibilities of your spreading factor
SF 7 = 242 Max Payload, SF 12 = 51 Max Payload